One of the best features of WordPress is the level of customization available. Almost everything is possible with the platform. Essentially it’s safe to say if you can dream it, you can do it. (Assuming you have enough resources of course!) If you’ve recently had a custom WordPress theme created, or if you sell custom theme development, one final level of customization to add the ultimate personal flair to your WordPress site is to custom tailor your WordPress login screen to match your freshly designed theme. Thanks to the development team at DisplayBuddy and their Tailored Login plugin, custom login screens are just a few clicks away for you, or your client – and I promise no coding knowledge is required.
For this example, we will quickly take my default login screen and whip up something simple (nothing too flashy!) which matches the style of MickOlinik.com.
This first thing you’ll need to do is pick up the plugin over at DisplayBuddy by purchasing the “Development Pack”. It comes at a cost, but is jam packed with great plugins which can help you add some creative features to your WordPress site easily–not to mention if you work as a developer they can save you tons of time when working on client websites!
Once you’ve purchased the plugin, the first thing you’ll have to do is get it installed and running on your site. It’s a painless process that any WordPress owner should be aware of – if not no worries! We’ve got you covered…
Navigate over to the Plugins section of your WordPress Dashboard and select Add New.

After selecting Add New, you will find yourself in the Install Plugin screen. In the navigation bar select the Upload option.
 Once in the Upload area, select Choose File and navigate to the plugin zip file downloaded from DisplayBuddy’s site. By default, it should be called tailoredlogin.zip.
 After you’ve got the file ready to upload, hit Install Now; and depending on your internet speed give it a few moments for the plugin to upload.

Once the upload is complete, you’ll have an option to activate the plugin. Be sure to click this option to get the plugin ready to roll.
 Now that we’ve got the plugin activated and ready to roll, we can start customizing the login screen! If everything went as expected, at the very bottom of your dashboard there will be a section labeled Tailored Login. After you’ve found the Tailored Login section, select the Style Manager option.

The style manager is your canvas for creating a custom login screen, providing easy ways to modify the following aspects:
- Login Page Background
- Login Form Header
- Login Form
- Form Labels
- Form Login Button
- Login Page Widgets
- “Back To Site” Link
- “Lost Password” Link

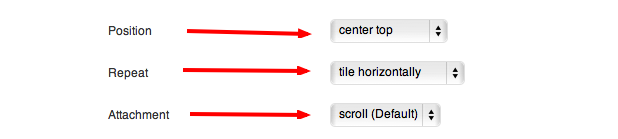
Now that the custom image is uploaded, it’s time to select the options. In this example, to match the current header on MickOlinik.com, we simply need to select the following options:
 Essentially, we’ve configured the header to center the original image and then repeat horizontally indefinitely in order to fit any size screen. We’ve left the Attachment setting to default. Unless you’ve filled your login screen with other custom modifications that require clients to scroll down, this is best left in its default state.
Setting the background color is as straightforward as entering in the color code desired. If you don’t know the color code you are after, fear not! DisplayBuddy has a color selection tool to help you configure your background color:

Once we’ve got a background color set, select OK and scroll down to the Logo Form Header section of the Style Manager:
 Setting the custom header image is literally the same process as selecting the background header. Simply use the Add Custom Image feature to upload an image of your choice (suggested size is 310×70,) and then configure the Position and Repeat settings. In this case, you almost always will leave the Repeat at its Default and can use the Position setting to play with your logo until it appears how you desire in the Header Image/Logo preview box shown above.
Once you’ve configured both of these options to your hearts desire, scroll down to the very bottom and find a blue button which reads Save Styles.

Click this, and your new custom login screen is live and ready for viewing!
The final product for our demonstration can be seen below….
BEFORE:
 AFTER:
 A custom login screen can really put the cherry on top, so to speak, for a custom WordPress design. Whether you are creating a custom login to add the last bit of personal flair to your website or are using it as a final touch on a clients website design Tailored Login by DisplayBuddy is sure to not disappoint!