It’s no secret that WordPress has a wonderfully robust comment system built into its core; and while there is nothing wrong with using it, sometimes it’s just not enough to get the job done. While many complex commenting systems exist, such as Discuss and LiveFyre, one of my personal favorite commenting systems to use is Facebook Comments.
I personally love Facebook Comments for a handful of reasons. The first is how user friendly it is. When you install Facebook Comments on your WordPress blog, you’ve essentially just given yourself access to 500 million user accounts. That’s right. 500 million users (an estimated number of Facebook accounts) now have a fully functional account on your website to leave comments without needing to login or even fill out a form with their name and email address. It’s that easy. My second favorite reason for using Facebook Comments is that, despite being so easy to comment on your site, it actually cuts down on the amount of spam you receive dramatically! Facebook has extremely powerful anti-spam systems, and those trickle into your website comments as well. No more countless spam comments, moderation emails, or Askimet API keys–all thanks to Facebook Comments.
The only downside to Facebook Comments is installing them, but thankfully a plugin has recently been developed that literally installs the system on your blog with the click of a button. No toying with developer apps, no API keys, just plug and play.
To get started with this system, the first thing you’ll want to do is download the plugin file here. Once you’ve downloaded it, you’ll want to head over to Plugins > Add New:

Once in the Add New area, select upload and upload the zip file we downloaded from the link provided above:

When prompted, Activate the plugin.
Once the plugin is activated, head to Settings > Facebook Comments.

Once in the Facebook Comments settings area, scroll down to the Settings section and verify that your settings match the following:

If everything looks correct on your install, simply scroll to the bottom and select Save Facebook Comment Settings.

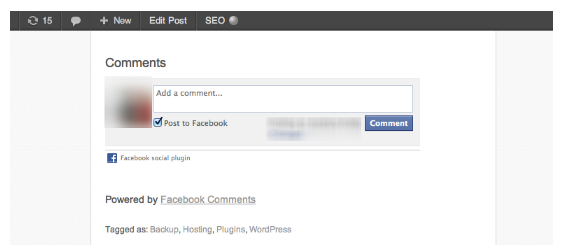
Now that we’ve saved and verified settings, simply visit any blog post on your website and scroll to the bottom. You’ll find Facebook Comments installed and running perfectly!

If you find that your Facebook Comments look a little off in terms of width, simply head back to the Settings > Facebook Comments screen and locate the section called Width under the Settings section and play with the number. Increasing the width increases the comments window, decreasing it decreases the width of the comments window. After a little toying you should be able to get the perfect size for your theme/layout!
![]()
That’s it! You’ve got Facebook Comments running! Congrats! No more fiddling with Facebook’s ever changing development system. Finally, a simple plug and play solution for a better comment system under WordPress.